.png)


How to Paint an Owl – a Class with Juliette Crane
- Feb 8, 2011
- 2 min read
Last Saturday, I attended a fabulous class at The Glitter Workshop “How to Paint an Owl with Juliette Crane.” I don’t do a lot of painting projects – I’m more into quilting and jewelry making but I’ll always jump at an opportunity to learn new techniques and tricks from an expert.

There were 13 of us in the class – some with painting experience – some with no experience what-so-ever. By the end of the four hour class – we all had an adorable little owl painting to take home with us. Juliette was really a great teacher with great hints and plenty of patience. I managed to take some step by step pictures of our painting process that I’m happy to share with you here.

Juliette had our painting boards primed ahead of time for us to choose from. This enabled us to complete the project in the four hour time period.

The next step was the ‘sketch’ our owl onto our board using pastels (they wipe off if you don’t like something…). Juliette broke down each part of the owl into shapes to make it easy for us to understand and create. I decided that my owl was a ‘pregnant’ owl so I modified my shapes a bit.

Once we were happy with our sketch, we got out our paints. All the supplies were provided but if we wanted to use our own materials that was okay to do.

Here is my owl roughly painted.

Once we had our basic owl painted, Juliette taught us about backgrounds and showed us some of her ‘go to’ techniques. One of the main thing she does is use papers to create dimension and fun elements to her paintings. Of course, my pregnant owl had to be standing on a branch of an apple tree! Juliette graciously shared all of her fun paper collection included vintage wall paper samples, origami papers, and sheet music for us to pick through and cut up for our own projects.

You can see here that my paper elements are added – now it’s time to work on the details!
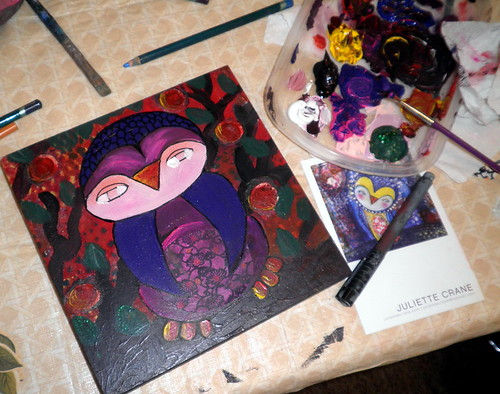
One of the things that scared most of us were doing the eyes. Once again – Juliette broke it all down into a couple of easy to understand instructions and we were all able to paint some decent looking eyes.

My owl is now complete – except for the last step…

Adding the top coat. Once it dried I had an adorable little Mama Owl to take home with me!

Here I am – a pregnant mama showing off my very owl pregnant mama owl.

And – here’s a photo of everyone showing off their adorable little owl. I have decided to use what I learned and the inspiration I got from the class to create my challenge piece for the latest Project QUILTING challenge. I’ll be sure to share with you what comes from that. If you want to learn how to paint your very own owl check out the classes coming up (one in Madison and one e-course): http://www.juliettecrane.com/workshop/index.shtml To see more of Juliette Crane’s work or purchase your very own check out her etsy site: http://www.etsy.com/shop/juliettecrane?ref=top_trail


Comments